


GLUU GUIDES
How to do simpler process mapping in 2025
Show a complex process map to your colleagues and chances are they will roll their eyes and abruptly excuse themselves. The good news is it doesn’t have to be this way. This guide will help you do process mapping using just four shapes to keep it simple and clear. Furthermore, it will guide you in using AI in your process mapping.
Table of contents
- How to do simpler process mapping in 2025
- What is process mapping?
- What are the benefits of process mapping?
- The process approach in ISO 9001:2015
- Why simple process mapping?
- Process maps must fit into a bigger ‘process hierarchy’
- How to draw a process map with just four shapes
- The basic shapes in process mapping
- Let’s map an example process
- Using AI for simple process mapping
- Conclusions
- Frequently Asked Questions
The oft used saying “less is more” is clearly the case for process mapping. As often with the best designs, it’s about elegant simplicity – using the bare minimum to achieve a balance of functionality and clarity. This means that you create simple process maps that people don’t need special training to decipher because they are instantly self-explanatory.
“Everything should be made as simple as possible, but no simpler”
Albert Einstein
After reading this guide you will understand:
- What process mapping is
- What the benefits of process mapping are
- Why process maps need to be simple
- How to organize collections of processes
- How to use AI to help with the process mapping
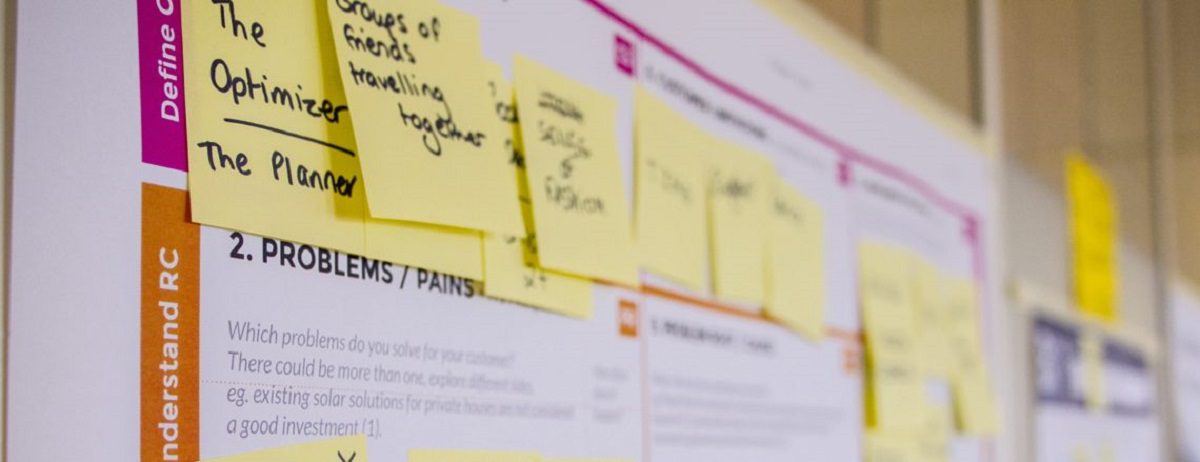
Before diving into each step in the mapping procedure, here is a cheat sheet or quick guide for simple process mapping:
Write what the process should deliver as result and outcome, then you have the scope for the process owner to start mapping. An example is ‘Customer support inquiry closed’.
Now add all the roles that need to help deliver the outcome. Order them with the most active first. An example is ‘Customer Support Agent‘.
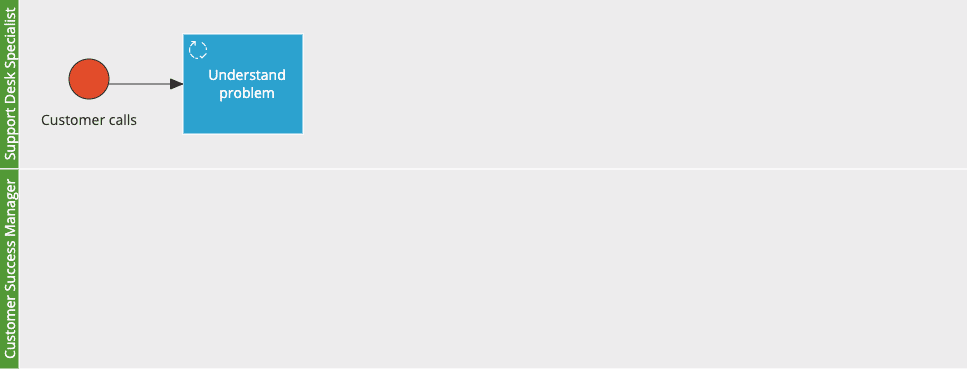
Show which outside event or other process that starts this process. An example is ‘Customer calls’.
Now add the main activities to do to the right swimlanes. An example is ‘Understand problem’.
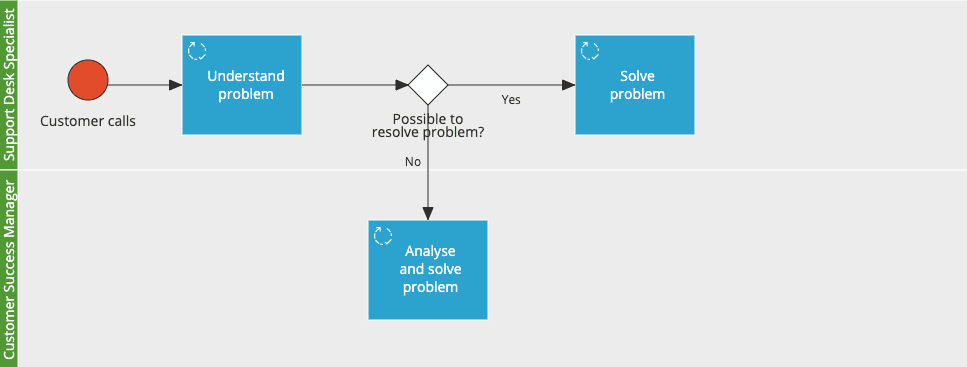
Decision gates can split the flow into multiple parts, for instance if you need to escalate a support case to a supervisor.
All main activities there to produce the process output? Then add an ending activity or process after each path. E.g. ‘Inquiry closed’ after ‘Customer accepts resolution.’
What is process mapping?
A process map is a visual diagram that explains who is responsible for executing a single work activity that involves more people. Moreover, you can think of the process map as a chain of activities where each activity delivers the output for the next one (and requires the input from the activity before.)
This could be…
- Ordering new stock,
- Handling a customer complaint,
- Sending a late payment notice, or
- Hiring a new department head
These are all examples of work activities that can be useful to create process maps for. ISO defines a process as
“a set of interrelated or interacting activities that use inputs to deliver an intended result.”
ISO – International Organization for Standardization
What are the benefits of process mapping?
Process mapping offers a number of benefits:
- They help you to see process improvement opportunities, in terms of customer experience, cost-saving or time efficiency.
- They ensure that everyone involved in a particular work function clearly understands their responsibilities and how to do the work they are responsible for.
- Importantly, process maps also ensure knowledge stays in your company. If key personnel leaves – his or her replacement will know how work is done by looking at the processes.
- They lay the foundation for automation, ISO and other certifications and the introduction of new business systems.
The process approach in ISO 9001:2015
Read more about the requirement for a process approach in ISO 9001:2015 in this ISO reference document (PDF).
Why simple process mapping?
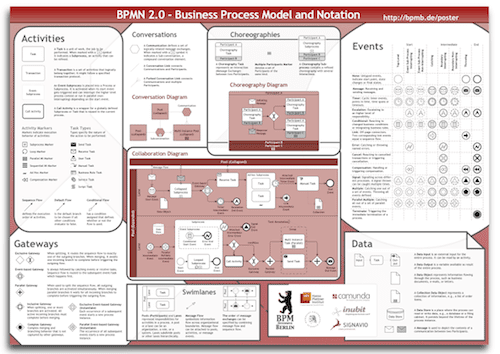
The world of process mapping is large and diverse. Like languages, process maps can be highly complex with upward of 50 shapes to create them with. However, they often bewilder people. Instead of being instantly understandable, some of the more complex process mapping techniques require employees to attend workshops just to understand them. This is – in most cases – unnecessary.
The alternative to simple process mapping is the Business Process Model Notation framework. This uses 55 shapes and is useful for detailed mapping to support ERP implementations.
Process maps must fit into a bigger ‘process hierarchy’
Let us give you some context. Process maps should be part of a process hierarchy. What is this? A process hierarchy shows the big picture for all the work processes in an organisation and how those processes relate to one another.
Process maps illustrate how one specific piece of work is conducted. So, if the process hierarchy is the blueprint for your organisation’s regular work, then the processes are its building blocks.
From BPMN’s 50+ shapes Gluu have used the four basic shapes that ISO also uses.
How to draw a process map with just four shapes
The foundation of a process map is its swimlanes. Each swimlane represents a role, for example, your sales assistant or your shop manager. They illustrate who is responsible, and for what. Utilizing comprehensive business process management software can simplify the creation of swimlane diagrams, ensuring clarity in role responsibilities and process flows. If you don’t reduce the scope of your process map in this way, then you run the risk of making convoluted processes for the sake of sophistication rather than usability.
Here’s how Gluu’s founder, Søren Pommer, explains it:
Focusing on “who does what” supported by research. Processes fail because handoffs and knowledge transfers between people go wrong. One person thinks his or her job is done, and the next one doesn’t know the baton has been passed to him or her. A swimlane diagram helps to recognize these points. They show exactly which role is responsible for which activity. When you connect people with roles then it starts to make sense for everybody.

The basic shapes in process mapping
We just explained the first, foundational shape: The swimlane. The remaining three are:
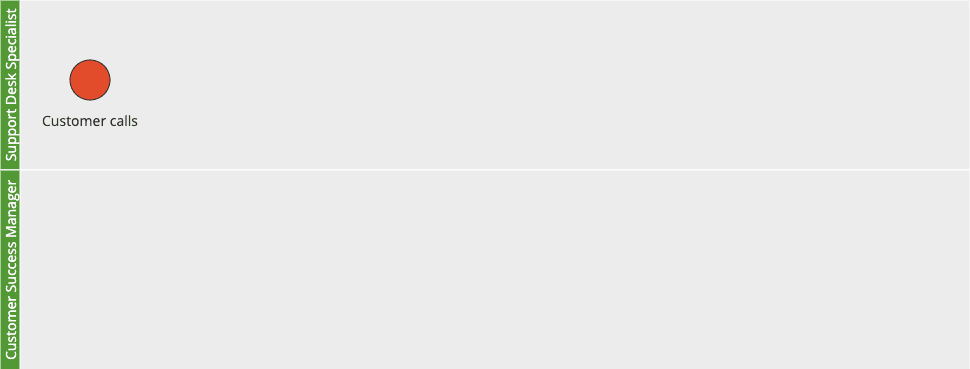
Events
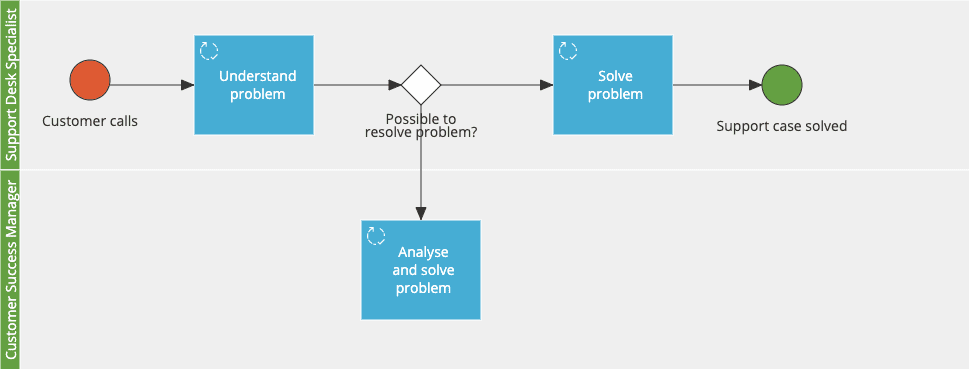
The purpose of these is to show when an event activates or ends a process. In our case a customer calls Support, which sets our process in motion for the responsible role: Support Desk Specialist.
Activities
These show the work that must be done, by the responsible role, to produce the output or outcome. A rule of thumb is that a process map should have between two to ten activities: If it has less than two, it’s an activity, not a process; If it hase more than 10 it should split into multiple processes. In our case the Support Desk Specialist must first understand the entirety of the problem prior to solving it.
Decision Gates
Notice the white diamond shape in the illustration? These indicate that a decision must be made. For example, if the Support Desk Specialist can solve the problem or if escalation to the Customer Success Manager is needed. You use decision gates along with a question that leads the responsible in new direction depending on the answer.
These are the four basic shapes.
👉 Recommendation: To build effective process maps, start by establishing a robust foundation with swimlanes, emphasizing “who does what.” Founder Søren Pommer asserts that this approach prevents handoff failures, ensuring clear responsibilities. Actively explore Events, Activities, and Decision Gates for clear activation points, work sequences, and decision-making nodes. Simplify complexity for usability and success.
Let’s map an example process
You have your swim lanes in place, and you know the shapes needed to draw the flow of your process. Here are three steps to creating a usable map:
Select and define a process to map
To begin it is important to choose a process that really matters for your company. Top picks are usually processes that involve legal or financial actions, quality related – or the processes that are really time consuming.
Setting it up
Before you start getting creative, there are a few things you need to do first.
STEP 1
Define its outcome
As support handling is important, so we will use that as our example. When naming a process, you should use an imperative – “Handle customer complaint”. This makes it personal and actionable.
What is the desired outcome of your process? What initiates it? And what brings it to a close?
In our example, Complaint handling the output is essential to turn angry customers into happy ones.
In our case the desired output is, “satisfied customer.”
An “output” is the outcome or deliverable that the process or activity should result in.
Assign a process owner
Now you know what the outcome is, it’s time to designate a process owner. A process owner is a person of flesh and blood residing within your company.
In our case, we are looking for a process owner to take care of complaint handling. What’s most important is that the process owner is experienced in that area. Consider these factors when assigning your process owner, who…
- has the most at stake?
- understands the end-to-end flow best?
- has the authority to really change the process?
You can read more about the process owner role here.
Examples of Process mapping features
Visual process connection map
Visualize how processes and activities interconnect using filterable, clickable process maps.
BPMN 2.0 mapping
Enable full BPMN 2.0 notation to support structured, standardised process modeling and mapping.
👉 Recommendation: Choose impactful processes, define outcomes clearly (e.g., “Handle customer complaint”), and designate a knowledgeable process owner with the authority to drive change. This focused approach ensures efficient and customer-centric process mapping.
STEP 2
Start drawing your swimlane map
Now you are ready to start adding the three shapes into your swimlane diagram. We will continue using the example of handling a customer complaint in our discussion here.
Defining the roles
First you must consider which roles are involved. Each role has its own swim lane indicating what activities and decisions that they are responsible for. In our case the Support Desk Specialist has the authority to escalate to the Customer Success Manager – or to solve the situation.
Starting the process
Our example process begins with a customer calling. Essentially, the event is what kicks off the rest of the process. In an ideal world, without complaints or need for support, you would not need a complaint handling process, as it would never be set in motion. But here we are.
The work activities
The different types of work required to complete a job are called “activities”. The face of the activity box shows a text on what should be done (ex. “Understand problem”) by the role. The location of the activity box on the swim lanes shows who is responsible for the solution.
You should use activity text much like chapters in a book. They should describe the content in a forward fashion, but the chapter itself might contain more details. Splitting the activity into several tasks, gives your reader (e.g. person who follows you process) more detail on how to solve the activity as a whole. Understanding a problem requires both listening, asking, testing and so on. If you have specific requirements for “Understanding problem” you can create to tasks: 1) Listen to customers issue, 2) test if the issue can be replicated. If needed, you can add a task regarding logging the call if you do not do this automatically.
The next step in our example, after understanding the problem, is deciding whether the issue should be solved or escalated to the Customer Success Manager. Generally, this is going to be the Support Desk Specialists responsibility. However, in some cases, they may need to escalate the problem. If this is frequently the case, it is a good idea to include them in the process with their own swimlane.
Decisions, solutions and the happy path
Decisions in a process are, maybe not surprisingly, called “a decision point”. You show decision gates on your swimlane diagrams as diamond shapes. They can illustrate everything from a simple yes or no decision to a more complex one, perhaps with more than two or three answers. Decision gates help us to see the points at which the responsibility for the solution may change. In our example, the Support Desk Specialists must decide whether the complaint can be handled immediately or if it needs to be escalated. If the Support Desk Specialists solves the problem without escalation this would be our preferred solution – also called the “happy path”.
We’ll keep this process simple for now and just add a closing event “Support case solved”.
Diverting from the ‘happy path’
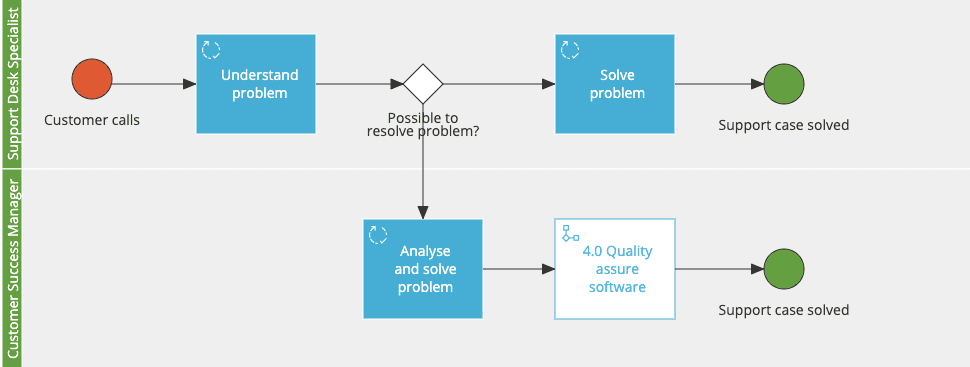
If your Support Desk Specialist decided to escalate the problem to the Customer Success Manager, the problem might be bigger than we initially anticipated. Your process should also be able to handle this. The activity “Analyse and solve problem” should probably include more tasks, as the solution might need more steps.
But maybe the problem requires a hot fix to your application? Then you need to ensure that the Customer Success Managers fix works across all possible areas. In other words: You need quality testing, which is a topic that is outside the scope of understanding and solving everyday problems.
Luckily, we have a “Quality assure software”- process on stock. So instead of creating that from the ground up you can include a Process link. In our case “Quality Assure software”.
If the content of that process is updated our process is updated too. Again, we need to tie the flow up with a “Support case solved”.
This concludes our guide to simple process mapping. The process map shows ‘what’ is done and ‘who does what’ but it doesn’t show ‘how’ work is done. That is for your work instructions, SOPs or procedures. So the next step is to add work instructions.
👉 Recommendation: In creating your swimlane map for processes like handling customer complaints, focus on defining roles, key events, and concise work activities. Integrate decision points for critical choices, like solving or escalating the issue. Emphasize simplicity initially, expanding details as necessary. Consider process links for connected procedures, ensuring a comprehensive and well-structured map.
Using AI for simple process mapping
In the last few years, AI has become an integrated part of most peoples’ daily life as well as an embedded element in many software tools. So, can you use AI in your processes mapping endeavors? Absolutely, but you need to be cautious and look for more specialized tools than the generic ones like ChatGPT, Co-Pilot etc.
You can of course use AI to seek inspiration about how to design your process, and who should be responsible for specific activities etc. but the results will be generic and unless you feed the AI with data on roles and competencies in your organization, it will not take your exact business model and organizational structures into account. If you try generating diagrams, the output will be close to useless.
Despite that generic generative AI evolves at a rapid pace, we recommend looking for specialized tools. Some can directly draw a diagram based on your description of the process, while others go beyond this and use standards and best practices to suggest responsibilities and activities based on the name and outcome of the process.

Example of Process Wizard using AI to design the process and draw the process map.
While AI cannot take over the job of designing processes and illustrating process maps in swimlanes with basic shapes.
Conclusions
In conclusion, simplify process mapping for effective communication and understanding within the organization. The guide emphasizes using four key shapes – swimlanes, events, activities, and decision gates – to create clear and concise process maps. By focusing on “who does what,” this approach ensures user-friendly and easily comprehensible processes, contributing to improved efficiency, reduced risks, and better organizational knowledge retention. The guide provides valuable insights into why simplicity matters, the benefits of process mapping, and practical steps for effective mapping. For a quick reference, a cheat sheet for simple process mapping is included, offering a concise overview of the key steps. With the emergence of specialized AI, you can create process maps based on standards and best practices.
Frequently Asked Questions
Process mapping is like making a visual story of who does what at work. Keeping it simple means making it easy for everyone to understand without needing special training.
Process mapping helps find ways to make work better, makes sure everyone knows their jobs, keeps important knowledge in the company, and helps set up new systems.
Process maps are like building blocks in a big plan for how a company does its regular work. They show a detailed picture of one specific job in the larger plan.
There are four shapes – swimlanes show who’s doing what, events show when things start or end, activities show the work that needs to be done, and decision gates show where choices are made. Using these shapes makes maps clear and easy to understand.
There is an increasing number of AI solutions that can create processes and process maps based on descriptions written in plain English (or other languages). However, the best assistants and wizards are the ones that are based on industry standards and best practices frameworks.